Key takeaways
- Over-Tightening Clamps on Plastic Elements: Tightening heavy steel clamps directly onto plastic armrest shrouds will cause the plastic to crack under tension. Always clamp to the metal structural core of the armrest.
- Ignoring Center of Gravity: Placing a heavy throttle too far outward from the chair’s center of gravity can make lightweight chairs tip over when you stand up. Keep the mount as close to the side of the seat pan as comfortably possible.
- Forgetting Cable Swivel Slack: Failing to leave enough cable slack near the base of the chair can rip the USB port out of your PC or snap the internal copper wiring when you turn to exit your rig.
- Incorrect Ergonomic Height: Placing the throttle too high forces your shoulder into a constant shrug. This leads to neck fatigue within less than an hour of flight time. Keep the controller at waist level.
What's inside
Flight simulation has reached unprecedented levels of physical realism. However, nothing pulls you out of the virtual cockpit faster than a sliding, unstable throttle controller. If you attempt to learn how to mount flight throttle to gaming chair frames without the correct approach, you risk more than just missed landing coordinates.
Improperly secured mounts can strip the delicate internal threads of your chair’s armrests, snap weak plastic brackets under high-tension maneuvers, or cause repetitive strain injuries in your wrists and shoulders due to poor ergonomic alignment. A rock-solid, ergonomically positioned Hands On Throttle-And-Stick (HOTAS) setup is essential for maintaining control during intense aerial maneuvers. By securing your throttle directly to your seating rig, you ensure that your controls remain perfectly positioned relative to your body, no matter how much you turn or recline.
As an Amazon Associate we earn from qualifying purchases at no extra cost to you. Product prices and availability are accurate as of the date shown and are subject to change.

What You Need
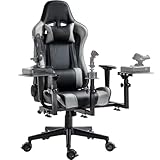
Before beginning your installation, gather the necessary tools and mounting hardware. Depending on your chair’s design and your budget, you can opt for a dedicated clamp-on bracket system or a full integrated floor stand that wraps around your chair frame.
| Item | Why You Need It | Optional? |
|---|---|---|
| Chair Mount Kit (e.g., EG STARTS 2 Set, $66.99, or Marada Flight Sim Chair Stand, $214.99) |
Acts as the structural bridge between your throttle base and the chair’s armrest or cylinder base. | No |
| Metric Hex Key Set (4mm to 6mm) |
Required to tighten the mounting brackets, adjust armrest plates, and secure heavy steel clamps. | No |
| Measuring Tape | Ensures symmetrical placement, correct height adjustments, and proper clearance for your thighs. | Yes (Highly Recommended) |
| Adhesive Rubber Pads | Placed between metal clamps and your chair’s armrest posts to prevent scratching and slipping. | Yes |
| Velcro Cable Straps | Secures long USB cords along the chair frame to prevent wheel entanglement. | No |
Step-by-Step Installation Guide
Mounting your flight throttle to your gaming chair takes roughly 45 to 60 minutes. Follow these steps to ensure a stable, ergonomically correct installation.
Step 1: Analyze Your Chair’s Armrest Construction
Estimated Time: 10 Minutes
Before assembling any metal brackets, inspect how your gaming chair’s armrests are attached. Most premium gaming chairs use three or four M8 bolts on the underside of the seat pan to secure the armrest pillars. If you are using a clamp-style mount (such as the EG STARTS set), measure the width of your armrest pillars. They typically need to be between 1.5 inches and 3.2 inches wide to accept standard clamp plates. If your chair features 4D adjustable armrests, identify the lowest rigid metal section of the armrest stem; clamping to the upper, moving plastic pieces will cause your throttle to wobble during flight.
Step 2: Assemble the Mounting Brackets
Estimated Time: 15 Minutes
Unpack your mounting kit and lay out the components on a flat surface. Most clamp-on kits feature a vertical support bar, a horizontal mounting plate for the throttle, and a clamping mechanism. Assemble these parts loosely using the provided hex bolts. Do not tighten them fully yet; you will need to adjust the height and angle once the assembly is on the chair. If you are using a comprehensive floor stand like the Marada system, assemble the base frame according to the instructions, leaving the height-adjustment collars loose enough to slide.
Step 3: Secure the Mount to the Chair Frame
Estimated Time: 15 Minutes
Position the mounting bracket against the rigid stem of your left armrest (or right side, if you prefer a side-stick configuration). Slip the mounting bolts or clamp plates around the stem. If your kit clamps directly to the armrest, apply adhesive rubber pads to the inside of the clamp to protect your chair’s upholstery or paint. Tighten the bolts in an alternating pattern to ensure even pressure. If your mount bolts directly to the seat pan, remove the existing M8 bolts from under your chair, align the mounting bracket’s pre-drilled holes, and reinsert the bolts. Tighten until firm, applying roughly 10 to 12 Newton-meters of torque to avoid stripping the internal threads.
Step 4: Align and Position the Flight Throttle
Estimated Time: 10 Minutes
Place your flight throttle (typically weighing between 3 and 7 pounds) onto the mounting plate. Most flight throttles have pre-drilled M4 or M5 screw holes on their base plates. Align these holes with the slots on your mounting plate. Secure the throttle to the plate using the bolts provided with your mount or throttle. Once attached, sit in your chair and check the height. Your elbow should rest at a comfortable 90-degree angle, with your wrist straight when resting on the throttle handle. Adjust the height of the mounting bracket up or down until this position is achieved, then fully tighten all structural bolts on the mounting kit.
Step 5: Route and Secure Cables
Estimated Time: 10 Minutes
A loose throttle cable is a major safety hazard for both your computer ports and your chair’s casters. Run the throttle’s USB cable down the vertical shaft of your new mount. Use velcro straps to secure the cable tightly to the metal frame. Ensure you leave a loose loop of about 6 to 8 inches near the chair’s central hydraulic cylinder. This loop provides enough slack to allow your gaming chair to swivel 360 degrees without yanking the cable from its connection or wrapping around the cylinder shaft.
Mistakes to Avoid
- Over-Tightening Clamps on Plastic Elements: Tightening heavy steel clamps directly onto plastic armrest shrouds will cause the plastic to crack under tension. Always clamp to the metal structural core of the armrest.
- Ignoring Center of Gravity: Placing a heavy throttle too far outward from the chair’s center of gravity can make lightweight chairs tip over when you stand up. Keep the mount as close to the side of the seat pan as comfortably possible.
- Forgetting Cable Swivel Slack: Failing to leave enough cable slack near the base of the chair can rip the USB port out of your PC or snap the internal copper wiring when you turn to exit your rig.
- Incorrect Ergonomic Height: Placing the throttle too high forces your shoulder into a constant shrug. This leads to neck fatigue within less than an hour of flight time. Keep the controller at waist level.
How Often to Inspect Your Setup
Because flight simulation involves rapid, repetitive physical inputs—especially during dogfights or crosswind landings—the connections on your mounting system will experience constant vibration.
Every three months, perform a quick structural check. Use your hex keys to verify that the bolts securing the mount to the chair frame are snug. Over time, the microscopic shifting of the metal plates can loosen these fasteners. Additionally, inspect the rubber protective pads on clamp-on systems to ensure they haven’t compressed to the point where metal-on-metal friction is damaging your chair.
When to Call a Pro or Replace
Most flight throttle mounting projects are highly accessible DIY tasks that do not require professional help. However, you should consider replacing your mounting setup if you notice hairline cracks forming in the aluminum brackets or if the threads on your clamping bolts become stripped.
If you own an expensive leather gaming chair with non-standard armrests or proprietary carbon fiber structural elements, do not attempt to drill custom holes into the frame yourself. In this scenario, consult a local custom metal fabricator or upholstery shop to create a custom adapter plate rather than risking the integrity of a high-end chair.
FAQ
Can I mount any brand of flight throttle to these brackets?
Yes, most dedicated chair mounts feature universal top plates pre-drilled to fit major flight simulation brands, including Thrustmaster, Logitech, and Honeycomb. If your specific throttle does not align with the pre-drilled slots, you can easily secure it using industrial-strength hook-and-loop tape or by drilling small matching holes into the mount’s aluminum plate.
Will mounting a throttle to my chair scratch the armrests?
It can if you clamp bare metal directly to the chair’s surface. To prevent scratches, scuffs, or tears on your gaming chair, always place adhesive rubber pads, neoprene strips, or even a small piece of heavy-duty craft felt between the clamp faces and your chair’s armrest stems.
Should I choose a clamp-on chair mount or a dedicated floor stand?
Choose a clamp-on chair mount if space is limited and you want your controls to move with you when you swivel or recline. Opt for a dedicated floor stand if you use a very heavy HOTAS setup or if your gaming chair lacks rigid, bolt-on metal armrests suitable for clamping.
How do I stop my gaming chair from rolling backward when I push the throttle?
To prevent your chair from rolling during intense flight sessions, you can replace your standard casters with locking caster wheels (which typically cost $15 to $25 for a set of five). Alternatively, you can place silicone caster cups or a low-pile rug under your chair to increase rolling resistance.