Key takeaways
- Locking Only Two Wheels: If you buy locking casters, do not make the mistake of only locking the front two. Under heavy braking, the unlocked rear wheels will slide sideways, causing your chair to pivot and throw off your steering alignment. Always lock at least four, and preferably all five, wheels.
- Using Soft Foam Yoga Mats: Do not place your chair on a standard yoga mat. The concentrated weight of a human sitting on five small caster wheels (often exceeding 200 pounds total) will quickly puncture, tear, or permanently stretch thin foam mats, rendering them useless within a week.
- Ignoring Cylinder Ground Clearance: When swapping standard 2.5-inch caster wheels for low-profile bell glides, your chair base drops closer to the ground. Check that the bottom of your gas lift cylinder does not touch or drag along the floor, which can ruin carpets or scratch wood.
- Relying on Cheap Adhesive Tape: Do not try to tape your wheels to the floor or wrap them in duct tape. The adhesive will quickly fail under lateral force, leaving a sticky, dirt-attracting residue on both your wheels and your flooring.
Few things ruin the immersion of a hot lap faster than stepping on the brakes and watching your monitor recede into the distance. If you are using a standard office chair for your home racing setup, this is an all-too-familiar frustration. When you depress a high-end load-cell brake pedal, which can require anywhere from 60 to over 200 pounds of force, Newton’s third law of motion takes over: the force you exert on the pedal pushes your body—and your rolling chair—directly backward.
If you do not solve this issue correctly, the consequences go far beyond a missed braking point or a ruined safety rating. Repeatedly sliding backward forces you to stretch your legs and arms, causing immediate muscle strain in your lower back, hamstrings, and knees. Over time, the sudden jerking movements can damage your desk, tear out pedal cables, or deeply gouge expensive hardwood floors (which can cost $8 to $15 per square foot to refinish). Securing your seating position is not just a comfort upgrade; it is a fundamental requirement for consistent lap times and physical health.
Fortunately, learning how to stop sim racing desk chair rolling is straightforward and can be customized to match your budget, flooring type, and aesthetic preferences. Whether you are running a casual desk setup or a high-end DIY hybrid rig in 2026, here is exactly how to lock your chair in place.
What You Need
Before you begin, inspect your current office chair. Most standard office chairs use a five-star base with caster wheels that insert via a metal stem. The standard stem size for about 95% of office chairs is 11mm in diameter by 22mm in length (approximately 7/16 inches by 7/8 inches), though some specialty chairs (like certain IKEA models) use a 10mm stem. Measure yours before purchasing replacement parts.
| Item | Why You Need It | Optional? |
|---|---|---|
| Bell Glides (Set of 5) | Replaces rolling wheels with flat, high-friction rubber feet. Best overall permanent solution. Costs $12 to $20. | No (if choosing the glide replacement route) |
| Locking Caster Wheels | Allows you to roll the chair during work hours and lock the wheels (via manual levers) for racing. Costs $18 to $35. | No (if you need the chair to remain mobile) |
| Silicone Caster Cups | Sits underneath your existing wheels to block movement. Ideal for renters who cannot modify their chairs. Costs $10 to $18. | Yes |
| Heavy-Duty Low-Pile Rug / Mat | Provides a high-friction surface and protects floors from scratches. Polycarbonate or rubber mats cost $25 to $60. | Yes (highly recommended for hardwood floors) |
| Ratchet Strap or Link Strap | Physically anchors the chair cylinder to your pedal base or desk frame. Essential for heavy load-cell users. Costs $5 to $12. | Yes (only needed for 80kg+ load-cell pedals) |
Step-by-Step
Depending on your budget and how easily you need to transition your chair from “office work mode” to “racing mode,” choose the method below that best fits your lifestyle.
Step 1: Measure and Remove Your Existing Casters (Time: 5 Minutes)
To prepare your chair for any wheel-replacement method, you must first remove the old casters. Lay your office chair on its side on a soft surface, such as a towel or carpet, to prevent scratching the armrests. Firmly grip one of the wheel assemblies and pull it straight out of the five-star base. Most casters are held in by a metal grip ring stem and will pop out with a strong tug. If a wheel is stuck, insert a flathead screwdriver between the caster stem and the plastic base, then gently pry upward. Use a digital caliper or ruler to confirm the stem diameter is 11mm before ordering replacements.
Step 2: Install Bell Glides or Locking Casters (Time: 10 Minutes)
If you do not need your chair to roll frequently, bell glides are the most stable solution. They convert your rolling chair into a stationary one by reducing the height clearance by about 1 to 2 inches.
- Take your new bell glides and push the metal stem straight into the empty sockets of your chair base until they click into place.
- If you opted for locking casters instead, push them into the sockets. Ensure the locking tabs face outward so you can easily reach them with your feet.
- Set the chair upright and test the height. Because bell glides are shorter than wheels, you may need to raise your chair’s gas cylinder by 1 to 1.5 inches to maintain your preferred ergonomic relationship to your steering wheel.
Step 3: Deploy Caster Cups on Hard Floors (Time: 5 Minutes)
If you prefer not to modify your chair because you use it for daily office work, silicone caster cups are an excellent alternative.
- Place a low-pile carpet or a non-slip rubber utility mat (measuring at least 3 feet by 4 feet) under your desk.
- Position your desk chair in your preferred racing alignment.
- Lift each caster wheel one by one and slide a silicone caster cup directly underneath it. The deep groove of the cup cradles the wheel, while the high-friction rubber or felt bottom of the cup grips the floor mat.
- To return to work mode, simply roll the chair backward out of the cups and stack them on your desk.
Step 4: Anchor Your Chair to the Pedal Stand (Time: 15 Minutes)
If you are using heavy-duty load-cell pedals (such as Heusinkveld, Fanatec ClubSport, or similar setups calibrated over 70 kg), even rubber glides can slide on slick floors under maximum braking pressure. You must physically tie the chair to the pedal stand.
- Loop a high-strength nylon strap or a small ratchet strap around the central hydraulic cylinder of your office chair, just above the five-star base.
- Run the other end of the strap forward beneath your seat and wrap it securely around the base frame of your wheel stand or pedal plate.
- Tighten the strap until there is zero slack. Now, when you press the brake pedal, the physical connection prevents the chair from moving backward relative to the pedals. This creates a rigid, closed-loop system similar to a dedicated aluminum profile cockpit.
Mistakes to Avoid
- Locking Only Two Wheels: If you buy locking casters, do not make the mistake of only locking the front two. Under heavy braking, the unlocked rear wheels will slide sideways, causing your chair to pivot and throw off your steering alignment. Always lock at least four, and preferably all five, wheels.
- Using Soft Foam Yoga Mats: Do not place your chair on a standard yoga mat. The concentrated weight of a human sitting on five small caster wheels (often exceeding 200 pounds total) will quickly puncture, tear, or permanently stretch thin foam mats, rendering them useless within a week.
- Ignoring Cylinder Ground Clearance: When swapping standard 2.5-inch caster wheels for low-profile bell glides, your chair base drops closer to the ground. Check that the bottom of your gas lift cylinder does not touch or drag along the floor, which can ruin carpets or scratch wood.
- Relying on Cheap Adhesive Tape: Do not try to tape your wheels to the floor or wrap them in duct tape. The adhesive will quickly fail under lateral force, leaving a sticky, dirt-attracting residue on both your wheels and your flooring.
How Often
To maintain a slip-free environment, establish a quick maintenance routine. If you are using silicone caster cups or rubber mats, dust and pet hair will accumulate on the bottom over time, significantly reducing their grip coefficient. Wipe the undersides of your caster cups with a damp microfiber cloth once every month to restore their stickiness.
If you use the strap-anchor method, inspect the nylon webbing and tension buckle every three months. Look for signs of fraying or slippage, especially where the strap makes contact with sharp metal edges on your pedal stand. Tighten any slack before starting a competitive race session.
When to Call a Pro or Replace
While DIY hacks, caster cups, and straps work incredibly well for entry-to-mid-range setups, they have their physical limits. If you have upgraded to professional-grade hydraulic or heavy load-cell pedals that require more than 90 kg (200 lbs) of force, standard office chairs are no longer suitable. The plastic five-star base of an office chair is not designed to handle repeated, high-angle structural loads; it will eventually flex, creak, or crack at the cylinder joint.
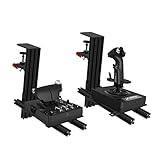
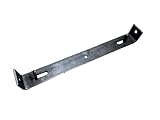
If your chair base begins to wobble, or if you find yourself constantly adjusting straps and slipping despite using premium glides, it is time to retire the office chair from your racing space. Instead of calling a professional, invest in a dedicated wheel stand that features a built-in “chair cradle” (a metal tray that captures two of your office chair’s wheels to prevent movement) or transition to a dedicated entry-level steel or aluminum profile cockpit. These specialized frames range from $200 to $500 and completely isolate braking forces from your seating position.
FAQ
Can I use tennis balls to stop my sim racing chair from rolling?
Yes, cutting a small “X” into five tennis balls and slipping them over your caster wheels can stop minor rolling on hard floors. However, this is a highly temporary, visually unappealing fix. The tennis balls will collect dirt rapidly, compress under heavy braking, and still slide under the high forces generated by load-cell pedals.
Will locking caster wheels scratch my expensive hardwood floors?
Standard hard plastic locking casters can trap grit and scratch wood floors when rolled. If you have hardwood, ensure you purchase locking casters made of soft polyurethane or rubber (often styled like rollerblade wheels). Alternatively, always place a protective polycarbonate or low-pile carpet mat beneath the chair.
What is the cheapest way to stop my chair from rolling?
The most budget-friendly solution is using silicone caster cups, which typically cost between $10 and $15 for a set of five. They require zero modifications to your chair, do not damage your floors, and can be put down or picked up in under ten seconds.
Do I need to remove my wheels if I use a wheel stand with a chair link?
No. If your wheel stand includes a built-in metal loop or cradle designed to hold office chair wheels, you can keep your standard wheels on. The cradle mechanically traps the wheels so that your braking force is transferred directly into the heavy frame of the wheel stand, keeping you perfectly stationary.