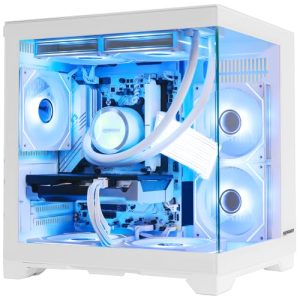
Key takeaways
- Keep the front intake path clear of loose cable.
- Do not let cables rest across the CPU cooler fan or a GPU fan.
- Avoid stacking thick bundles in the main airflow lane between intake fans and the graphics card.
- Leave a little slack so connectors are not under constant tension, and so a hot, swollen bundle does not pull on a port.
- If a thick bundle sits behind the tray, make sure the back panel still closes comfortably so that nothing presses on the connectors.
To manage cables inside a PC, install the power supply and motherboard first, route every cable through the gaps in the motherboard tray so the thick bundles sit behind it, secure them with reusable hook-and-loop straps, and leave a little slack at each connector. The goal is simple: keep cables out of fan paths, keep connectors free of strain, and keep airflow clear. A tidy build looks better, and it also makes later upgrades and cleaning easier.
Safety First
Shut the PC down, switch off the power supply and unplug the power cord before touching internals. Touch bare metal on the case to discharge static, and never open the power supply itself. When you handle the GPU power connector (the 12VHPWR or 12V-2×6 type on many recent graphics cards), follow the graphics card maker and power supply maker guidance: seat it fully, and avoid sharp bends right next to the plug. If you ever see discolouration or heat damage on a connector, stop using it and contact the maker.
Plan Before You Plug In
Most cable problems come from installing parts in the wrong order. A typical sequence works well:
- Lay the case on its side and remove both side panels.
- Check where the case provides routing holes, rubber grommets, tie-down loops and the cable channel behind the motherboard tray.
- Install the power supply first and decide which cables you actually need. With a modular or semi-modular unit, connect only those cables. Fewer cables means less clutter.
- Mount the motherboard, then the CPU cooler and RAM, then storage and the graphics card last, because the GPU blocks access to lower headers.
The Main Cables and Where They Usually Go
| Cable | Connects to | Typical routing tip |
|---|---|---|
| 24-pin motherboard power | Large connector on the board edge | Run it behind the tray and bring it through the nearest hole to the connector |
| CPU power (4+4 or 8-pin EPS) | Top-left area of most boards | Route behind the tray and come out near the top; check the board manual for the exact socket |
| PCIe power for the GPU | Graphics card power socket | Use the cables the power supply maker supplies for that card; do not force a sharp bend at the plug |
| SATA power and data | SATA drives | Keep behind the tray, use shorter runs, mount drives on the back side where the case allows |
| Front panel and USB headers | Pins along the board edge | Bundle neatly and follow the pin diagram in the board manual |
| Fan and RGB cables | Fan headers or a hub | Use a fan hub or controller if you have many fans, so fewer cables cross the board |
Step-by-Step Routing
- Start with the big one. Feed the 24-pin cable through the lower-right hole, plug it in, then pull the slack back behind the tray.
- CPU power next. Run it through the top hole when the case has one, or the closest side hole, and plug it in at the board.
- GPU power. Route the PCIe cable from behind the tray to the card, leaving it straight enough to avoid stress. If the plug sits against the side panel, make sure the panel closes without pressing on it.
- Storage. Place SATA drives behind the tray if the case has mounts there, and keep the extra cable inside the rear channel.
- Front panel connectors. Plug the small header wires in using the manual, since the pin order differs between boards. Then dress the cables along the board edge.
- Fans. Plug fans into the headers closest to them, or into a hub. Keep all spare cable behind the tray or in a corner away from blades.
- Fasten. Use the built-in loops and straps to hold groups of cables. Pull each strap snug, not tight.
- Close the back panel. If the rear panel will not close, the bundle is too thick, so re-route or trim the number of cables.
Ties and Tools: What Works Better
| Tool | Pros | Cons |
|---|---|---|
| Hook-and-loop straps | Reusable, gentle on cable insulation, easy to adjust | Slightly bulkier |
| Plastic zip ties | Cheap and low profile | Single use, can cut into insulation if pulled hard, sharp tails if not trimmed |
| Cable combs | Make flat parallel runs for visible cables | Fit specific cable counts, need patience |
| Sleeved extension cables | Improve looks and rigidity | Must match your power supply maker pinout; mismatched cables are a hazard, so follow the maker guidance |
A common reviewer recommendation is to prefer reusable straps while the build is still changing, then swap to a few neat ties only if you are sure of the layout. Never use a tie to force a connector at an angle.
Airflow Matters More Than Looks
- Keep the front intake path clear of loose cable.
- Do not let cables rest across the CPU cooler fan or a GPU fan.
- Avoid stacking thick bundles in the main airflow lane between intake fans and the graphics card.
- Leave a little slack so connectors are not under constant tension, and so a hot, swollen bundle does not pull on a port.
- If a thick bundle sits behind the tray, make sure the back panel still closes comfortably so that nothing presses on the connectors.
Common Mistakes
- Installing the GPU before routing the cables. It blocks your hands. Route first, plug in the GPU last where possible.
- Using every cable that comes with the supply. Extra SATA and Molex leads add clutter. Use only what you need.
- Cinching ties too tightly. Over-tight ties can damage insulation and strain connectors.
- Bending the GPU plug sharply. Many card and power supply makers advise against tight bends near the connector.
- Mixing cables between power supply brands. Modular pinouts are not standardised. Use the cables that came with your unit, or ones made by the maker for that exact model.
- Cable lengths ignored. A cable that is too tight pulls on the plug, and one that is far too long creates a bunch you cannot hide.
- Forgetting the front panel header diagram. Wrong pins can mean a power button that does not work. Check the board manual.
Tidying an Existing Build
If the PC is already running, power it off and unplug it first. Start by unplugging the cables you can identify, rerouting them through the nearest tray hole, and strapping them into bundles of cables that travel in the same direction. Work from the power supply outward, and take a photo before you start so you can restore connections if needed. Do not unplug the front panel header unless you have the manual open, because pin order is easy to mix up.
Frequently Asked Questions
Does cable management improve temperatures?
It can help in cramped cases by keeping cables out of the airflow path, but the effect varies by case and parts. Reviewers generally treat tidy cabling as a bonus for airflow and maintenance rather than a major cooling upgrade.
Should I use zip ties or hook-and-loop straps?
Reusable hook-and-loop straps suit builds you may change, because you can open them without cutting. Zip ties are fine for a final, settled layout, but they should be snug, not tight, and the tails should be trimmed flush.
What if the back panel will not close?
The cable bundle behind the tray is usually too thick. Remove unused cables, flatten the bundle against the rear panel, re-route to spread cables across the channel, and see whether your case has a recommended depth. If you must force the panel shut, you risk damaging connectors.
Are sleeved extension cables worth it?
They mainly improve appearance. If you buy them, make sure they are made for your power supply model according to the maker, because pinouts differ between brands. Incorrect cables can damage parts.
Can I hide cables in a case with a small back channel?
Yes, with fewer cables and careful routing. Use only the connectors you need, choose shorter custom or maker-supplied cables if available, and use the case tie-down points to flatten bundles against the panel.
Is it safe to bend the GPU power cable?
Gentle curves are normal. Sharp bends right at the connector are discouraged by many graphics card and power supply makers, particularly for the 12VHPWR and 12V-2×6 plug. Follow your card maker guidance, and stop using the cable if you see heat damage.
FAQ
Does cable management improve temperatures?
Should I use zip ties or hook-and-loop straps?
What if the back panel will not close?
Are sleeved extension cables worth it?
Can I hide cables in a case with a small back channel?
Is it safe to bend the GPU power cable?
More from Amazon
Programs that pair well with the guide above. Offers and eligibility are set by Amazon and may change.
Free shipping on eligible items, Prime Video and more. Eligible new members can start with a free trial.
Start a Prime free trialAd-free music streaming. Eligible new subscribers can start with a free trial.
Try Music Unlimited freeA Prime membership for ages 18-24 with a trial period. Eligibility is set by Amazon.
See Prime for Young AdultsAudiobooks and podcasts to listen to on the go. Eligible new members can start with a free trial.
Try Audible freeAs an Amazon Associate we earn from qualifying purchases.