Key takeaways
- Power off or unplug the board, then turn it upside down and gently shake to dislodge loose debris.
- Blast between the keys with compressed air, working in short bursts and moving row by row.
- Wipe the keycaps with a microfiber cloth lightly dampened with isopropyl alcohol to lift finger oils.
- Run a dry brush along the seams to sweep out anything the air missed.
What's inside
- Watch: How to Clean a Mechanical Keyboard — Video Review
- Gather the Right Tools Before You Start
- The Quick Weekly Surface Clean
- Pulling Keycaps for a Deep Clean
- Washing Keycaps and Cleaning the Base
- Handling Switches and Spills
- Tips
- Related Guides
- Frequently Asked Questions
- Conclusion
- Related Articles
- Related Guides
Mechanical keyboards attract mess the way few gadgets do. The gaps around every switch invite crumbs, dust, skin oils, and the occasional splash of soda, and because you press these keys thousands of times a day, that grime works its way deep. Left alone it dulls the keycaps, makes switches feel scratchy, and in bad cases causes chattering or dead keys. The good news is that a mechanical keyboard is one of the most cleanable devices you own, precisely because the parts come apart.
- Watch: How to Clean a Mechanical Keyboard — Video Review
- Gather the Right Tools Before You Start
- The Quick Weekly Surface Clean
- Pulling Keycaps for a Deep Clean
- Washing Keycaps and Cleaning the Base
- Handling Switches and Spills
- Tips
- Related Guides
- Frequently Asked Questions
- Conclusion
- Related Articles
- Related Guides
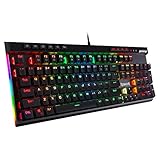
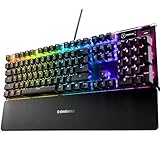
This guide covers a full 2026 cleaning routine, from a five-minute surface tidy to a deep clean with the keycaps pulled off. You will learn what tools to keep on hand, how to lift keycaps without snapping stems, when a hot-swap board makes the job easier, and how to dry everything safely. Whether you own a budget Redragon or a premium SteelSeries, the process below keeps it typing and sounding like new. The keyboards recommended here are all easy to maintain and make good reference points.
As an Amazon Associate we earn from qualifying purchases at no extra cost to you. Product prices and availability are accurate as of the date shown and are subject to change.





⚡ Save on Your Next PC — Amazon Prime
Prime members get fast free shipping on the systems above, plus early access to Prime Day & Black Friday PC deals. New members get a 30-day free trial.
Watch: How to Clean a Mechanical Keyboard — Video Review
Gather the Right Tools Before You Start
A proper clean needs surprisingly little. Keep a keycap puller (the wire kind is gentler than plastic ring pullers), a can of compressed air or a small blower, a soft brush, isopropyl alcohol of 90 percent or higher, cotton swabs, and a microfiber cloth. For boards with removable keycaps like the Redragon K580 or the AULA F75 Pro, a small bowl and a colander help when you wash caps in bulk. Avoid paper towels on the surface, since they shed lint into the switch housings.
The Quick Weekly Surface Clean
- Power off or unplug the board, then turn it upside down and gently shake to dislodge loose debris.
- Blast between the keys with compressed air, working in short bursts and moving row by row.
- Wipe the keycaps with a microfiber cloth lightly dampened with isopropyl alcohol to lift finger oils.
- Run a dry brush along the seams to sweep out anything the air missed.
Done once a week, this five-minute routine prevents the buildup that forces a deep clean in the first place.
Pulling Keycaps for a Deep Clean
When keys feel sticky or the board looks visibly dirty, remove the caps. Slide the wire puller under a keycap, hook both sides, and pull straight up with steady pressure. Photograph your layout first so you can put everything back correctly. Larger keys such as the spacebar and Enter use stabilizers; lift these slowly and note how the wire clips in. Set the caps aside in a bowl. Never yank at an angle, because that stresses the switch stem and can crack it.
Washing Keycaps and Cleaning the Base
Soak the loose keycaps in warm water with a drop of dish soap for a few hours, swish them, then rinse and lay them on a towel to air dry completely, which can take several hours. While they dry, clean the exposed base: brush around each switch, use compressed air to clear the deeper dust, and go over the plate with a cotton swab dipped in isopropyl alcohol. The alcohol evaporates fast and leaves no residue, which is exactly why it is preferred over water near the electronics.
Handling Switches and Spills
If a single switch feels scratchy on a hot-swappable board, you can pull just that switch with a switch puller and clean or replace it without soldering, one of the quiet advantages of boards like the Redragon models. For liquid spills, act fast: unplug immediately, flip the board to drain, remove keycaps, and blot rather than wipe. Let it dry for at least 48 hours before powering on. Sugary drinks are the worst offenders and almost always require pulling caps to reach the sticky residue underneath.
Tips
- Never submerge the whole keyboard; only loose keycaps are safe to soak, never the base with electronics.
- Confirm keycaps are bone dry before reinstalling, as trapped moisture can cause switch issues.
- Eat away from your desk to cut crumb buildup dramatically and stretch the time between deep cleans.
- Keep a dust cover or simply drape a cloth over the board when it sits unused for long stretches.
Frequently Asked Questions
How often should I clean my mechanical keyboard?
A quick surface clean weekly and a full keycap-off deep clean every three to six months suits most users. If you eat at your desk or have pets, clean more often.
Can I use water to clean the switches?
Avoid water on the base and switches. Use high-percentage isopropyl alcohol instead because it evaporates quickly and will not linger in the electronics. Only loose keycaps should ever touch water.
Is it safe to remove all the keycaps?
Yes, as long as you pull straight up with a proper puller and photograph the layout first. Take extra care with stabilized keys like the spacebar so you do not bend the stabilizer wire.
My keyboard has a stuck or double-typing key. Will cleaning fix it?
Often, yes. Debris under a switch is a common cause of chattering. Clean the switch first; if the problem persists on a hot-swap board, swapping in a fresh switch is the next easy step.
Conclusion
Cleaning a mechanical keyboard is less a chore than a habit that keeps a favorite tool feeling crisp for years. A weekly air-and-wipe pass handles the everyday grime, while a periodic deep clean with the keycaps off restores the fresh-out-of-the-box feel. Stick to isopropyl alcohol near the electronics, dry everything fully, and lean on the hot-swap convenience if your board offers it. Treat the keyboard well and it will reward you with the same satisfying feel and sound you bought it for.